Tuesday, December 25, 2018

How to create a new Notebook in Databricks?


Notebook is the place where you write code in Python, Scala, SQL or R. In a notebook you can write a block in Python and other block in Scala or any other language. During run time code the code executes and shows the output regardless on the language its written.


You can execute your notebook step by step by clicking on “Run” option in each cell or you can run the whole notebook by clicking on “RullAll” at the top.
Ensure you have attached a cluster before click on “Run” icon.


Steps to create a new Notebook


Step 1:  Login to Databricks account


Step 2: You will get “Welcome to databricks” screen


Step 3: Click on “Workspace”, then “Create” and “Notebook”.


Step 4: Give the Notebook name and choose your Language in which you are planning to write code.


Step 5: Click on Detached dropdown and Attach your cluster. In below example “MyClusterOne” is the cluster name.


Step 6: You can see the cluster is added to the notebook.


Step 7:  Now, write code in your Notebook. Please find sample python program (printing “Hello World” text). Click on “Run Cell” to execute the program.


Step 8: Below program finds sum and average salaries.


Step 9: You can add new cells by clicking on “+”


Step 10: From document perspective you can write comments in the Cell as shown below:


Step 11: You can run all the code in a Notebook by clicking on “Run All” icon.


Step 12: Please find sample code written in multiple languages in a single workbook.


sample SQL code in same notebook


How to create a new Cluster in Databricks?

Cluster is the place where the actual code is executed. The code is generally written in notebooks and it can be executed in 2 ways (a. Interactively in Notebook or b. By Scheduled Jobs). With Databricks, we can easily manage clusters (like Create, Edit, Start, Terminate, Delete, Clone and etc…)


Steps to create a new cluster


Step 1:  Login to Databricks account


Step 2: You will get “Welcome to databricks” screen


Step 3: Click on Clusters


Step 4: Click on “Create Cluster”, you will get below screen


Step 5: Give Cluster Name (in below example its “ClusterOne”), select Databricks Runtime Version, Python Version and Availability Zone. Click on “Create Cluster” button.


Step 6: A new cluster will be created after few mins, as shown below.


Step 7 : You can click on Spark UI to find more details about cluster


ClusterOne is created in AWS cloud service


Additional Info :
Please note: In trail version, if the cluster is inactive for 2 hours or more continuously, then it will be terminated automatically.  Hence you need to create the cluster again.


Next Step: Create a Notebook


How to create a free Databricks account and start work with it?


To learn Databricks you can create a free Databricks account by following the steps below. This account can be used to practice Clusters, Workspace (Notebooks), Data, SparkUI and etc. This free account is created in AWS (Amazon Web Services).

Paid version has some additional features like Jobs (Scheduling) and etc. 


Step 1: Go to below URL:


Step 2: Go to “Community Edition” and click on “Get Started”


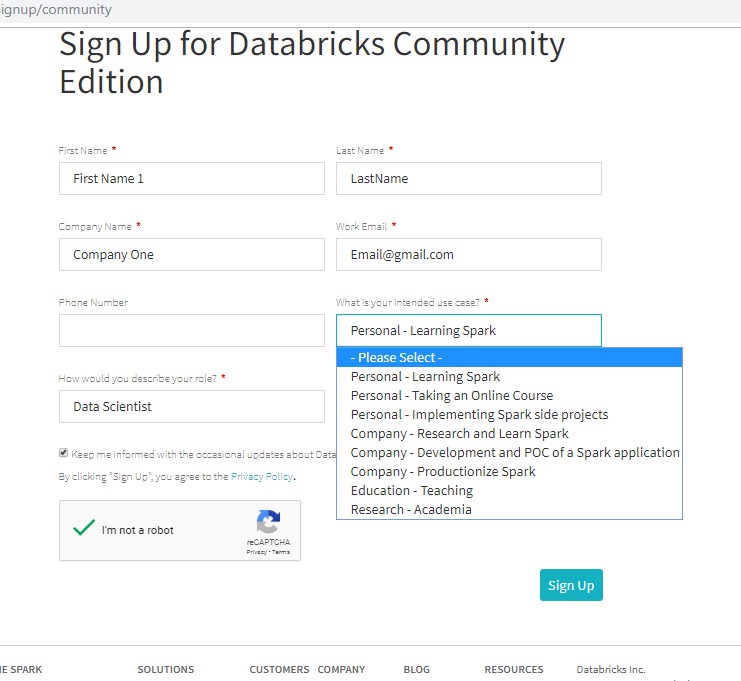
Step 3: Fill-in below form (Sign up for Databricks Community Edition) and click on “Sign up”.


Step 4: You will get email from Databricks to confirm your email address


Step 5: Click on the link and choose your password


Step 6:  Go to login Screen and give your credentials (email address and password)


Step 7: You will get Databricks welcome screen


Step 8: You can create your own new Notebook or Cluster or Table 


Additional Info:
1. Welcome to Big Data world.
2.  Databricks can be developed and deployed in Azure cloud or Amazon Web Service Cloud.
3.  To lean more about Databricks pricing please refer below link.


Thursday, October 4, 2018

Azure – Data warehouse – Elastic feature in Azure SQL Server


Azure – Data warehouse – Elastic feature in Azure SQL Server

Given Scenario:
I have more than 1 Azure SQL databases and I need to write ETL program to populate records from more than one database, also need to do some manipulation or massage the data before loading. Due to country specific regulatory requirement and licensing cost, I was recommended not to use Azure Data Factory or Azure Data Bricks.

Solution:
Azure SQL Server Database has a feature called “Elastic Query”, by using this feature you can connect to more than one Azure SQL databases and write queries on them. Therefore, you can connect and fetch records from more than one database.

There are 5 steps that you need to follow to use Elastic feature                         
Step 1: Create Master Key
CREATE MASTER KEY ENCRYPTION BY PASSWORD = '<Password>';

Step 2: Create database scoped credential
CREATE DATABASE SCOPED CREDENTIAL <ElasticDBQuery_Name>
 WITH IDENTITY = '<UserName>',
 SECRET = '<Password>'; 
                                                                            
Step 3: Create External Data Source
CREATE EXTERNAL DATA SOURCE <DS_Name4Elastic> WITH
    (TYPE = RDBMS,
    LOCATION = '<Azure SQL Server>',
    DATABASE_NAME = '<Azure Database>',
    CREDENTIAL = < ElasticDBQuery_Name >,
) ;

Step 4: Create Schema (This is optional – I created it for clarity purpose)
Create Schema <Elastic Schema>
ð  This is to separate elastic tables with other database objects. This step is not needed.

Step 5: Create External Tables
CREATE EXTERNAL TABLE [<Elastic Schema>].[DimCustomer](
[CustomerNumber] [int] IDENTITY(1,1) NOT NULL Primary Key,
[CustomerName] [nVarchar](100) NULL,
[LocationKey] [int] NULL,
……
)
 WITH
( DATA_SOURCE = <DS_Name4Elastic>,
                SCHEMA_NAME = '<SourceDBSchema>',
                OBJECT_NAME = '<SourceDBTableName>'
                )

GO


Challenges:

  •        Except nVarchar(Max), other LOB data types are not support (eg XML Datatype).
  •        To call Stored Procedure from one Azure database to another database. You need to use “EXEC SP_EXECUTE_REMOTE”.
  •        When you use “EXEC SP_EXECUTE_REMOTE”, you cannot return set of records as output parameter.
  •      Create table in Source, Dump the data in Source, then pull it in Target (using elastic feature)
                  
Limitation of Elastic Queries:


  •         Running your first elastic query will take few minutes because it load the elastic query functionality.
  •          Scripting of external data sources or external tables from SSMS or SSDT is not yet supported.
  •          Import/Export for SQL DB does not yet support external data sources and external tables. If you need to use Import/Export, drop these objects before exporting and then re-create them after importing.
  •         Elastic query currently only supports read-only access to external tables. You can, however, use full T-SQL functionality on the database where the external table is defined. This can be useful to, e.g., persist temporary results using, e.g., SELECT INTO, or to define stored procedures on the elastic query database which refer to external tables.
  •          Except for nvarchar(max), LOB types are not supported in external table definitions.
  •          Column statistics over external tables are currently not supported. Tables statistics are supported, but need to be created manually.


Reference materials:


Other Info:
a. The source table structure and external table structure should be same.
b.  If the password or credentials are changed in source database, then use below command to change the credentials.

Error Message
Msg 46824, Level 16, State 1, Line 192
Login failed on <Azure SQL Server>.  Please verify that the shards are accessible and that the credential information affiliated with external data source <DS_Name4Elastic> is correct.


Fix
 ALTER DATABASE SCOPED CREDENTIAL <ElasticDBQuery_Name>
 WITH IDENTITY = '<UserName>',  
 SECRET = <New Password>';


See the link for further details


Saturday, July 8, 2017

Introduction to GIT and SourceTree


Git is an open source Version Control software to handle from small to very large projects with speed and efficiency. For documentation you can see the "https://git-scm.com/doc" link.


I used "SourceTree" as frontend in my local machine. It's a GUI for GIT and also a free software which you can download from "https://www.sourcetreeapp.com" link. The Graph at the Left give pictorial representation the history of the code. The description shows


The key concepts of GIT are as follows:

Remote Master:
This is main repository where the code is stored.  It has the latest merged code.

Local Master:
A copy of all code from remote master is stored in Local. Every developer has to set this in order to do the development.

Clone:
=> Clone option is to get a local copy from remote repository
=> Sample screenshot shown below


Pull changes from a remote repository (Git)

=> Click on the local branch you want to work or local master to get the latest changes from REMOTE Master.
=> Click on Pull button top.


Commit and push a change (Git)

=> Click on Commit button on top
=> Select to files you want commit
=> Click on Stage option.
=> All the selected files will be moved to Stage


=> Give the comments for Commit and enable "Push changes immediately to -". As shown below.


=> The changes will be saved and pushed to Remote.


Create a branch (Git)

=> Click on Branch button on top
=> Give new branch name as shown below


=> It will be created locally
=> Your changes will be tracked & saved in the newly created branch.


See the link for further details (it also contains creation and push a branch to the remote repository). https://confluence.atlassian.com/get-started-with-sourcetree/commit-and-push-a-change-git-847359114.html


Merge changes from one branch to another (Git)

You can merge the changes from other branches. Please see the link for further details


To setup a repository please see the following link. This explains various scenarios of setting up a repository.